Thom's WireGuard Documentation
This is a basic guide to setting up the WireGuard VPN with a main server and a couple client nodes. For the majority of this guide, I will assume the working environment to be Linux.
While this should be used only for personal reference, I've seen this solution in production on both my personal website and NixNet.
Note
If you're needing to implement a VPN solution for your infrastructure, please consult some extra resources for best practices in your situation. I can't guarantee that copy/pasting this guide will work for your situation.
Introduction
What is WireGuard?
WireGuard defines itself as "an extremely simple yet fast and modern VPN that utilizes state-of-the-art cryptography." Before continuing, let's break down this statement.
A Virtual Private Network, or VPN, is technology that allows a multitude of computers/servers from all across the world to be tied into a single private network as if they were sitting in the same room. This provides a multitude of both security advantages and pure networking conveniences for system administrators.
WireGuard also claims to use "state-of-the-art cryptography" for security. This means that data transmitted over a WireGuard network is safe from the prying eyes of third parties. Explaining the exact specification of what WireGuard uses for its cryptography is beyond the scope of this document. For those who remain curious however, the technical whitepaper states that it uses a collection of:
- Curve25519 for ECDH (Elliptical Curve Diffie-Hellman)
- HKDF for key expansion of ECDH results
- RFC7539's construction of ChaCha20 and Poly1305 for encryption
- BLAKE2s for hashing
The above cryptography can also seen being referenced in The Noise Protocol.
Why Should You Use WireGuard?
WireGuard allows multiple computers/servers to be tied together even when they're not in the same location. This technology has been increasingly used by the typical consumer, but its original role of large scale network management hasn't been forgotten.
By linking servers from around the world over a secure connection, we can easily pass information between them without having to worry about security of the applications or services actually sending/receiving this information.
The classic example is being able to route or load balance incoming (and encrypted) web traffic to a collection of back-end servers. This is simple if the computers are in the same building and the thought of someone sniffing traffic between the load balancer and the back-end isn't important. When the servers are in different locations however, the communication has to be secured somehow. Thus enters WireGuard.
Description of Equipment & List of Materials
For the purposes of this guide, you will need:
- A server with a static IP address
- Some client computers to be connected
- Some basic knowledge of the Linux command line
Installation
Note
There are two parts to WireGuard: the core code that allows transmission of network information over a WireGuard interface, and the user-land tools that allow you to work with WireGuard. As of the Linux 5.6 kernel, the core WireGuard code is included. The following information is strictly for the user-land tools.
The WireGuard tools need to be installed on both the server and the clients. This varies depending on the specific Linux distribution, but for my case of AlpineLinux on the server and ArchLinux on the clients, and the tools are included in their respective package repositories.
Install on AlpineLinux:
apk add -U wireguard-tools
Install on ArchLinux:
sudo pacman -S wireguard-tools
Debian based Linux distributions would use:
sudo apt install wireguard
I can't suggest using Microsoft Windows at all, but I would especially not recommend using it as the server. If you're going to have a Windows client connect to your WireGuard network, you will need to fetch the installer from here: https://download.wireguard.com/windows-client/.
Download the .exe file and run it. The installer will walk you through the
rest.
Setup
Simplified Overview
This is the most important step of this guide. WireGuard needs to be configured before it can do anything useful.
Without going into unnecessary depth, WireGuard creates 'virtual' network devices on your computer. Traffic sent over this device is sent to the server, then it's forwarded from there to the correct destination.
As an example, if Client 2 wanted to send some kind of network request to Client 1, it would send traffic over its WireGuard interface to the server. The server would then look at the packet of information and decide what to do with it. If everything checks out (the user is properly authenticated), the server will bounce the message to Client 1 (the original destination).
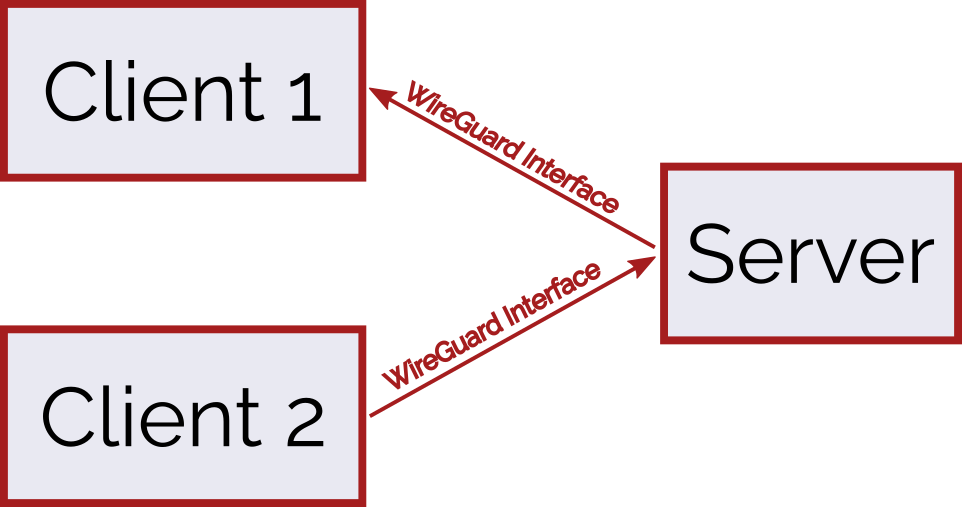
All of this routing logic is handled behind the scenes, so it's not crucial to know how it does all of this. What is important is that each of the clients have to properly identify themselves to the server for the server to route the traffic.
The Configuration (w/ examples)
To set up the above configuration, three key-pairs and configuration files have to be created.
Generating Keys
Asymmetric key pairs will have to be generated for each of the devices on the WireGuard network.
For those unaware, asymmetric key pairs are made of two pieces of information: one secret, and one public. The secret key goes on the device it belongs to, and the public part will go on the server in our case.
To generate the keys, type the following into a terminal:
wg genkey | tee privatekey | wg pubkey > publickey
The above command does two things:
- It uses the
wg genkeytool to generate a private key and save it to a file namedprivatekey. This is the "secret" part, so don't share it with anyone. - It then generates a public key using this same private key and saves it to a
file name
publickey. This part doesn't need to be kept secret.
We can then print out the keys that wg generated:
cat {privatekey,publickey}
Which prints out two lines:
2FKu9/7RppQsW+MhejnJVu9bzIRbmJj3zWe1Gj/fZHs=
eOnnVahlSaHpjAv9w1My3u6azw5T4OtWGMAMlLSgzSM=
The first one is the secret and the second is the public key. Make note of these because they're needed in the next part.
Note
Remember to generate keys for all the devices you plan to use.
Keep track of what keys go to which device. You might want to save them in
separate files for each device.
Writing Configuration Files
Once keys are generated for each of the devices, we need to now tell each of the devices how to connect to each other.
Note
wg0.conf can be replaced in the following examples depending on what you
want the network to be named. Just remember to leave .conf as the file
extension.
We should start with the clients. This process will also need to be repeated for each client you choose to connect.
On Linux machines, edit /etc/wireguard/wg0.conf. You will need
root/administrator privileges to access this directory.
In my case, I would run:
sudo vim /etc/wireguard/wg0.conf
Open the config file, and the following needs to then be inserted into the file:
[Interface]
Address = 10.0.0.1
PrivateKey = <client-private-key>

[Peer]
PublicKey = <servers-public-key>
EndPoint = <servers-public-ip>:4534
AllowedIPs = 10.0.0.0/24

PersistentKeepalive = 25
In the above configuration, a few things will have to be replaced:
- The
Addressunder[Interface]is what you want the IP of the client to be. This has to be different on ever device. I suggest starting with10.0.0.1for the first client and incrementing from there (10.0.0.2,10.0.0.3, etc.). <client-private-key>needs to be replaced with the private key you generated for the device earlier.<servers-public-key>needs to be replaced with the public key you generated for the server earlier.<servers-public-ip>needs to be replaced with the public IPv4 address for the server that is going to be facilities this VPN. An example would be108.177.122.100.
Note
If you're more advanced with networking, you can substitute the
10.0.0.0/24 subnet with another local subnet of your choice. Be sure to
know what this means before you do it.
Once the above process has been repeated for the other client, the server needs to be configured.
Open the same file on the server (/etc/wireguard/wg0.conf) and add the
following into it:
[Interface]
Address = 10.0.0.0
ListenPort = 4534
PrivateKey = <server-private-key>
PostUp = iptables -A FORWARD -i %i -j ACCEPT; iptables -t nat -A POSTROUTING -o eth0 -j MASQUERADE;iptables -A FORWARD -o %i -j ACCEPT
PostDown = iptables -D FORWARD -i %i -j ACCEPT; iptables -t nat -D POSTROUTING -o eth0 -j MASQUERADE;iptables -D FORWARD -o %i -j ACCEPT

# Client 1
[Peer]
PublicKey = <client1-public-key>
AllowedIPs = 10.0.0.1/32

# Client 2
[Peer]
PublicKey = <client2-public-key>
AllowedIPs = 10.0.0.2/32
As with the configurations on the clients, some values need to be substituted:
<server-private-key>: the private key generated for the server<client1-public-key>: the public key generated for client 1<client2-public-key>: the public key generated for client 2
Starting the Network
The essential configuration is now setup, but nothing is communicating with
each other yet. WireGuard interfaces still have to be created on each of the
devices. This can be simplified using the wg-quick utility.
To turn on WireGuard, run the following command on each of the devices:
sudo wg-quick up wg0
Now any information that is sent to the addresses of the other devices
(10.0.0.0, 10.0.0.1, or 10.0.0.2), will travel over the secure WireGuard
tunnel.
FAQ
Q: What is the advantage of WireGuard over other VPNs (OpenVPN, IPSec)?
WireGuard takes a slightly different approach to networking than some of the other big VPNs. WireGuard is directly implemented into the Linux kernel these days, but the best part is the raw speed WireGuard supports.
According to the WireGuard whitepage, WireGuard has been with nearly 4 times the throughput of OpenVPN, and could respond to pings over 3 times as fast. The shear speed of WireGuard makes it very desirable in production environments, while remaining just as (if not more) secure than alternatives.
Q: Is there an easier way to setup WireGuard?
There are tools out there to help setup WireGuard and manage keys on the various nodes in the network; however, I would recommend getting comfortable setting up a basic network with WireGuard's built in tools.
A quick search on the internet will probably give you some WireGuard configuration tools, but I can't recommend any as I haven't personally used them.
Troubleshooting/ Getting Support
WireGuard is fairly robust and hard to break, but there are a few steps that usually catch people up.
Below are a couple common issues, but if all else fails you can ask questions
in the #wireguard channel on the Freenode IRC server.
Check Your Keys
By far the most common mistake is getting the WireGuard keys wrong. If you're struggling to get WireGuard to work, remake your key pairs.
Be extra careful to note which key goes to which device and that its pasted into the correct spots in the configuration files.
Check The Server's Public IP
If the WireGuard clients aren't connecting, it could be that the wrong server
IP was used as the EndPoint in the client configurations.
Contributing
If you would like to contribute to this guide, the source is hosted over on the NixNet Git server. Open an issue if you think there's something that needs to be added, changed, or removed.
Licensing
WireGuard and WireGuard-tools are licensed under the GPL 2.
This page is licensed under CC BY-SA 4.0.